
You can see the resulting charts here.
I have lost various components due to lightning strikes nearby. I now have a seperate section on surge protection.
I also added a water flow monitor to measure the amount of water that we consume in the house. This is partly due to the fact that we are on a well, and have a fairly limited supply of water.
I've just added a water depth sensor to the pond. Hopefully this will allow me to spot leaks and evaporation.
The rain gauge was assembled from a kit purchased from Dallas
Semiconductor. It is designed to be mounted on an aerial mast, but I didn't fancy
having to climb up onto the roof -- so I just stuck in about two feet off the ground.
I hid it behind a rock so that it isn't visible from the house. However, I don't think
that the rock prevents much (if any) rain from getting in. Almost certainly the rock
disturbs the airflow and hence the precise rain values, but I'm not running the NWS.
The rain gauge stopped working once -- I suspect that water got onto the little circuit board inside it. Dallas replaced the board, and it now works fine. The original board was covered with a rubber coating, and I used 'Liquid Electrical Tape' to coat the replacement board after I mounted it to the internal bracket.
The one downside with the current location is that pine needles get stuck in the
hole in the funnel as it is really too close to some trees.
 This was built out of a a DS18S20 soldered onto the end of a piece of Cat3 cable (twin twisted pair telephone
wire).
In order to make it waterproof, I liberally daubed the DS18S20 and the joint with GE Silicone Rubber (GE012)
and then slipped some heatshrink over the end. After shrinking the heatshrink and letting it cure
for 24 hours, the result seems to be waterproof. My first attempt was just to use the heatshrink tubing,
but that leaked after a few days. If you try this, then be careful about which sort of silicone
rubber or caulking that you use. Very few of them are rated for use in aquariums (the closest thing
to a pond that I could find). I don't know if this is because they contain nasty chemicals that the
fish don't like, or whether they have never bothered to do the testing. I played it safe and got
the one that said 'safe for use in aquariums (of 10 gallons or less)'. It turns out that the
10 gallon restriction (which I violate by two orders of magnitude) is a pressure restriction -- they assume
that you are going to use the caulking to seal up the glass to the frame.
This was built out of a a DS18S20 soldered onto the end of a piece of Cat3 cable (twin twisted pair telephone
wire).
In order to make it waterproof, I liberally daubed the DS18S20 and the joint with GE Silicone Rubber (GE012)
and then slipped some heatshrink over the end. After shrinking the heatshrink and letting it cure
for 24 hours, the result seems to be waterproof. My first attempt was just to use the heatshrink tubing,
but that leaked after a few days. If you try this, then be careful about which sort of silicone
rubber or caulking that you use. Very few of them are rated for use in aquariums (the closest thing
to a pond that I could find). I don't know if this is because they contain nasty chemicals that the
fish don't like, or whether they have never bothered to do the testing. I played it safe and got
the one that said 'safe for use in aquariums (of 10 gallons or less)'. It turns out that the
10 gallon restriction (which I violate by two orders of magnitude) is a pressure restriction -- they assume
that you are going to use the caulking to seal up the glass to the frame.
The picture looks a bit mucky -- I had just pulled the sensor out of the pond during cleaning and I took the picture. All you can really see is the wire going in at the left, the heatshrink tubing, and a little bubble of the silicone rubber at the right.
 This is an entirely homebrew approach to making a screen temperature sensor. It may look like a bunch of
plastic bowls turned upside down -- and, in fact, that is exactly what it is. I took six plastic
bowls from the local party store (88 cents each) and cut off the rolled over rim. I drilled three
holes in each for three threaded rods to hold the whole assembly together. I made spacers out
of small clear plastic pipe (from Home Dept, 8 cents per foot -- two feet required). I tried to
get plastic threaded rod, but I was forced to use steel in the end.
This is an entirely homebrew approach to making a screen temperature sensor. It may look like a bunch of
plastic bowls turned upside down -- and, in fact, that is exactly what it is. I took six plastic
bowls from the local party store (88 cents each) and cut off the rolled over rim. I drilled three
holes in each for three threaded rods to hold the whole assembly together. I made spacers out
of small clear plastic pipe (from Home Dept, 8 cents per foot -- two feet required). I tried to
get plastic threaded rod, but I was forced to use steel in the end.
Three of the bowls (number 3, 4 and 5 from the top) have a large hole in the middle as well. This creates a vertical path for hot air to rise, and then flow out of the side. The DS18S20 is just attached to the end of the Cat3 cable that you can see at the bottom of the picture. This is then covered in white electrical tape to protect it (somewhat) from the elements. Initially I used black tape, but I think that enough light was getting through the plastic to cause heating effects. I have convinced myself that white tape is better (although much more expensive!). The actual sensor is mounted about an inch above the bottommost solid bowl in the center of the three support rods. In fact the wire is just wrapped around the vertical support rods, but this seems to hold the sensor in place.
I plan to add the humidity sensor here as well (after coating most of it with liquid rubber).
I need to paint the wooden support white. The whole result is then attached to convenient
post that holds up my deck. Yes, it should be further away from any obstruction, but you live
with what you can get.
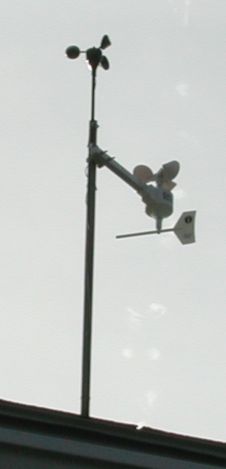 This is a three cup unit which rotates even in the gentlest breezes. The shaft
has a rotor on the end with two magnets. These cause a reed switch to close
twice on each revolution. [Actually, I used to only get one closure, and
sometimes I was even convinced that I got that! I moved the rotor abut 1/16
inch closer to the reed switch, and it seems to work better.]
This is a three cup unit which rotates even in the gentlest breezes. The shaft
has a rotor on the end with two magnets. These cause a reed switch to close
twice on each revolution. [Actually, I used to only get one closure, and
sometimes I was even convinced that I got that! I moved the rotor abut 1/16
inch closer to the reed switch, and it seems to work better.]
The reed switch causes a counter in the unit to increment, and this is read out every 10 seconds or so. The counter difference is divided by the time interval to get revs/sec and then multiplied by a calibration constant to get mph. [I actually use two different constants depending on the revs/sec value. This is because cup anemometers are notoriously insensitive at very low wind speeds.]
The wind speed is then averaged over a minute or so to get the 'wind speed'. The gust value is derived from the largest reading from a 10 second interval.
The picture shows two anemometers -- the one on the top is an AC generator
type and is directly connected to an analog display in the kitchen.